gumpt1oo
Manx
 For England and St George!
Posts: 1,318
|
Post by gumpt1oo on Jan 30, 2009 14:37:50 GMT -5
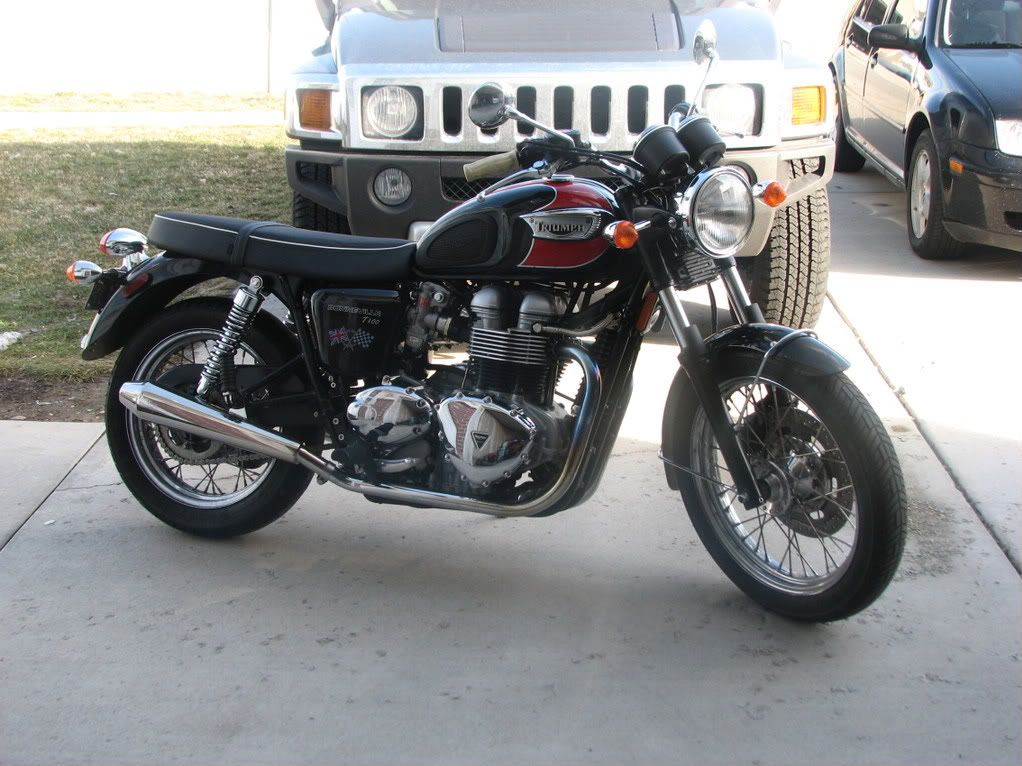
Even though I really like the tangerine and cream on my T100, I have always fancied a bonnie styled similar to the 'great escape' Triumph. You know, sprung saddle, rack, army paint job etc. Well over the past year I have collected from flea-bay and various places, a spare set of mudguards,tank, and side panels, so that I can keep my original stuff, well, original! I also bought a sprung saddle for a Norton, and this is my progress so far.  I wanted to keep everything as low to the frame as possible, the only thing that stands higher than the frame are the electrics under the rear section of the seat.  So being a chippie, I made a plywood template with a cut out for the electrics.  Removed the leather work from the saddle.  And mounted the saddle frame to the template. As soon as I sat on it, I realised the seat was way too high. It was 8'' high in total, I couldn't reach the floor! So I modified the brackets and ordered some shorter springs.  I then cut the seat base out of 16 guage steel, and fitted stiffeners underneath to transfer the weight from the seat to the frame. I made it up in 2 parts so that the rear section can remain in place while the saddle section can be removed to access the battery.  I then made a box cover to fit over the electrics using some re-cycled aluminium. (the sides of the box are made out of a surveyors staff that the digger driver ran over at work) I can't weld so the aluminium box is rivetted together.  I then fitted the rear mudguard.  Followed by a rack (sshh it's of a lambretta!) and a rear numberplate and light from a T120.    This is the finished seat height with 3'' springs and the modified brackets. I intend to paint the mudguards, tank, and side panels Olive Drab, and the seat base and rack satin black to match the frame. Up front I am fitting gaitors, black headlight and a ped slicer, and will look at modifying the guages somehow. Any advice on painting would be welcome! I will post more as it progresses! |
|
|
|
Post by oldscratcher on Jan 30, 2009 15:27:47 GMT -5
Looks fantastic Gumpt. I can't wait to see the finished product. I think the seat looks too level, with it's lower back springs. & I think the front needs to come down a 1/4" or so. To give it the right angle. But that could just be me.
|
|
|
|
Post by davidc on Jan 30, 2009 16:45:23 GMT -5
Very creative, gumpt! I like the single sprung seat look, but not with the upper frame showing. That is going to look coolio!
|
|
|
|
Post by rodburner on Jan 30, 2009 21:46:53 GMT -5
Gump,when I messed with the sprung seat,I just made a small bracket of flat steel,with a couple bolts welded on,pointing up.Then just bolted that to that little metal shelf directly behind the battery.It kinda sunk the seat assembly down,into the frame. Since you already have the seat mounted,you can unbolt those electrical components and just lay them on top of the battery with a bit of weatherstripping between them.That will get rid of that raised box.  |
|
|
|
Post by davidc on Jan 30, 2009 23:17:53 GMT -5
Good idea!
|
|
gumpt1oo
Manx
For England and St George!
Posts: 1,318
|
Post by gumpt1oo on Jan 31, 2009 4:57:42 GMT -5
[Posted by oldscratcher on Yesterday at 8:27pm
Looks fantastic Gumpt. I can't wait to see the finished product. I think the seat looks too level, with it's lower back springs. & I think the front needs to come down a 1/4" or so. To give it the right angle. But that could just be me.]
You could be right scratch, with the 5 1/2" springs it felt like I was sat on top of everest! falling towards the tank. I have lowered the front when I fitted the 3" springs but I think I will only get it spot on after I have ridden it.
[Posted by davidc on Yesterday at 9:45pm
Very creative, gumpt! I like the single sprung seat look, but not with the upper frame showing. That is going to look coolio!]
I agree David, I did not like the look of the rear frame exposed.
[Posted by rodburner on Today at 2:46am
Gump,when I messed with the sprung seat,I just made a small bracket of flat steel,with a couple bolts welded on,pointing up.Then just bolted that to that little metal shelf directly behind the battery.It kinda sunk the seat assembly down,into the frame. Since you already have the seat mounted,you can unbolt those electrical components and just lay them on top of the battery with a bit of weatherstripping between them.That will get rid of that raised box.]
Rodburner, I was tempted to move the electrics under the seat to eliminate the box cover, but I wanted to make it an easy swap for the dual seat for when my Mrs comes for a ride. With the electrics in there original position remove 5 bolts and the whole thing comes off and the dual seat straight on. I am hoping when I get it painted black it will not be as noticeable, time will tell!
|
|
|
|
Post by ventura on Jan 31, 2009 12:02:12 GMT -5
Good job Gump!! Lookin' forward to seeing the finished item!! Start looking for some barbed-wire fences to jump!  V. |
|
BluesRider
H.M.F.I.C.  A.K.A. CommandoRoadster Livin' the dream........
Posts: 2,765
|
Post by BluesRider on Feb 1, 2009 1:02:25 GMT -5
Steve,I think that's going to look cool as hell when you're done. I actually like the box.It gives it a utilitarian/military look.In fact,looking at it,I think I might have got a little metal tool box,and cut out the bottom,and mounted it there.Put a sort of false bottom in the box,and you'd have a little storage area. I really like the number plate.It's going to look perfect with a ped slicer up front. That seat looks pretty comfortable.sitting up a little higher will give you more leg room,something I could use for sure. Sitting static,I think it's at just about the right tilt,but when your weight compresses the springs,you might find you want the rear a little higher,or the front lower. When I mounted a solo on my BSA,I used eye bolts for the front,so it was an easy matter to adjust the height of the front. For the black stuff,you might look into tractor & implement paint. It has just about the right gloss factor to match the frame,and it's super tough.Several manufacturers make it,but I'm most familiar with Plastikote.They make it in O/D,and just about every other color you can think of,too. Of course,now you have get rid of all your shiny bits.I'd be happy to swap you my scratched up black engine cases for your chromy ones.  Paint your wheels black.Make some little brackets to move the front mudguard up a couple of inches,and mount a big fat trials tire up there.Then,you'll need a trials tire for the rear,or it just won't look right,and since no one makes a 17'' one,you'll need to lace up an 18'' wheel.  I'm looking forward to seeing the finished bike.  Cheers! Bruce |
|
gumpt1oo
Manx
For England and St George!
Posts: 1,318
|
Post by gumpt1oo on Feb 1, 2009 10:57:23 GMT -5
bruce, I wasn't too sure about the box initially, but now I have painted it I really like it. Your idea of actually mounting a metal tool box is a great idea, one I might use in the future. The numberplate and rear light I picked up from a classic bike shop here in the UK. It is a pattern part for a T120 and it cost £30 including the light, which I think was a bargain! It's been a long time since I painted anything, but it seems great minds think alike!  I had already bought some Plastikote super satin black. I gave the bare metal 2cts of etch primer, and then 3 cts of black. I didn't realise that Plastikote do O/D, I will have to check that out. Here is a couple of shots of painting in progress, and the box with 2cts of black satin.   Now all this talk of getting rid of the shiny bits, now just calm down a bit! Wheels and casings are to remain shiny! I am aiming for a subtle blend of black, olive drab and chrome, each complimenting one another. (thats my BS explanation and I'm sticking too it! ;D) As for raising mudguards and trials tyres, I am only trying to achieve the 'great escape' look, I am not actually going to jump any fences!LOL ;D |
|
|
|
Post by propforward on Feb 3, 2009 14:16:19 GMT -5
Steve - it's most excellent! Looks really good and really well made!
|
|
BellaCorse
Tiger Cub
 I gotsta have it. More cowbell.
Posts: 40
|
Post by BellaCorse on Feb 3, 2009 21:33:56 GMT -5
Mikey likey!
|
|
gumpt1oo
Manx
For England and St George!
Posts: 1,318
|
Post by gumpt1oo on Feb 8, 2009 11:19:59 GMT -5
Well, I made a bit more progress this weekend, bloody cold in the garage though, not above freezing all weekend! I have decided to put the stock headlight ears back on, (I had been using some shiny LSL brackets) so this meant I needed the key hole and indicator holes blanking off. Out came the jigsaw and files, made up some blanks.  I found some nice black mini indicators for £28 for 4.  Painted the blanks, and fitted the ears, indicators and fork gaitors.  I also got the seat and rack assembled (after the paint had finally dried) and fitted, I like it much more now its painted black.  Fitted my long front mudguard and ped-slicer from a BSA Bantam.   And blacked out my layflat and A/F guage bracket.  I am going to have to find some different bars, with the longer rear shocks and the slightly higher seat I need some higher bars with a bit more pullback, I might put the stock bars back on to try it. Couple more weeks and I should be ready for painting the tank, mudguards and side covers olive drab, needs to warm up a bit though! |
|
|
|
Post by Midnight on Feb 9, 2009 0:34:09 GMT -5
nice work gump well engineered riding the bumpy stuff will be a breeze now...
|
|
|
|
Post by imafunkyman on Feb 18, 2009 11:10:21 GMT -5
Looking good Steve! |
|
gumpt1oo
Manx
For England and St George!
Posts: 1,318
|
Post by gumpt1oo on Mar 8, 2009 8:17:19 GMT -5
Well, Iv'e made a bit more progress. It turns out that Max, my next door neighbour has his own paint shop and is going to paint all my bits for me, which is much better than me p***ing about with spray cans! I have got all the holes drilled for ped-slicer, rear number plate etc, filled the fixing holes for the stock light, and Max picked them up at the weekend.  Bits ready to go! I have also been toying with the idea of running with no tacho for a more minimal look. Now my tools are no match to D9's but I had a go at a layflat bracket!  What you see is what I used.  Bracket cut out and mounted to make sure it fitted before painting!  I also fitted these 1" higher risers, they have 'blind' threaded tops so no bolts are visible, I think they will eventually be painted black.   Bracket after painting with stock handlebars fitted. I have ordered some wide flattracker bars, they should arrive this week. I can't make my mind up which guage set up I prefer now! What do you guys think? This one, Or this one? |
|